This post contains affiliate links, meaning I get a commission if you decide to make a purchase through my links, at no extra cost to you. Please read my disclosure and privacy & terms for more info.
Owning a motorhome, fifth-wheel, or travel trailer is an absolutely amazing experience, hobby, or even way of life.
In fact, the whole skip-the suitcase-and-bring-your-home-along, has really gotten popular over the years!
After all, RVing allows you to haul along basically everything you need plus the fun extras and luxury items that can’t be squeezed into a suitcase.
While built to live and roam the open road, recreational vehicles are also designed to carry a fresh water supply as well as hold the used water and waste created throughout travel. Once waste water accumulates and fills the holding tanks onboard, they must be properly emptied in a designated dumping station.
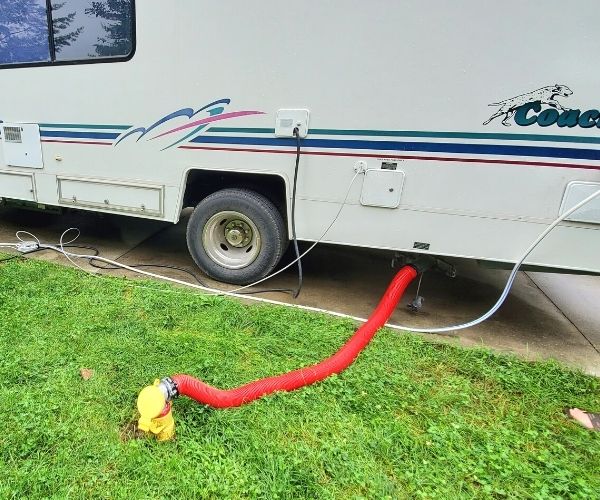
Although the task of emptying the holding tanks can be daunting at first, the good news is once done a handful of times it becomes a breeze so you can get on with your favorite camping activities!
At the same time, a few tips and tricks below can help keep your tanks in tip-top shape while making sure systems run smoothly for many years to come.
How to Dump Your… Dump! Step-by-Step Instructions Plus Terms, Tips & Tricks for a Smooth Process
To jump to step-by-step instructions on how to empty RV waste tanks, click here!
Understanding RV Tanks
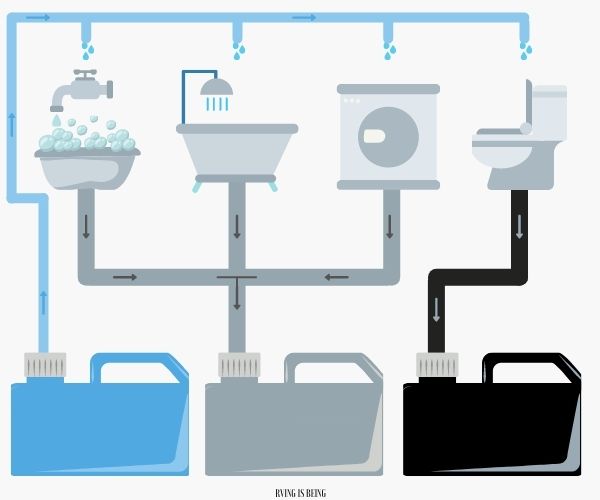
Freshwater Holding Tank
Holds clean, potable water for drinking, cooking, cleaning and more. This tank supplies water to the sink, shower, toilet and washer.
Gray Water Holding Tank
Holds the used, dirty water from the sinks, shower, laundry and washer.
Black Water Holding Tank
Holds the waste and water flushed from the toilet(s).
FYI: Most RVs come equipped with three basic water tanks; a fresh water, gray water, and black water holding tank. However, some have dual holding tanks; meaning two gray, two black or even two fresh water holding tanks.
Turdy-Terms to Know
Blue Boy – Portable container that transports wastewater. With a variety of sizes available and sometimes made of blue plastic, hence the name, this container is used to empty gray or black holding tank contents into and transport from the RV to a dump station. (Some campers also call this tote a Honey Pot.)
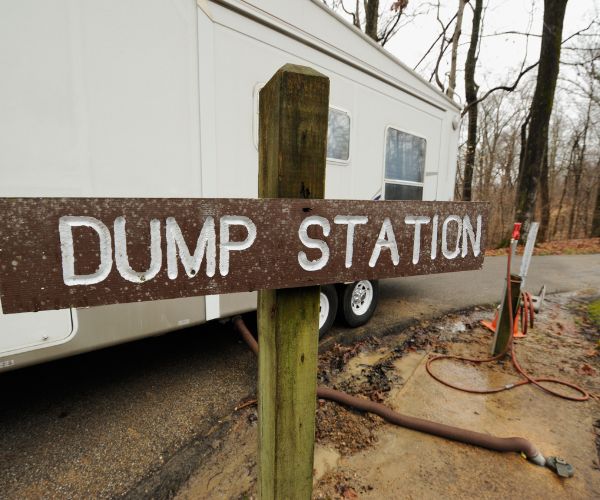
Dump Station – A place where wastewater and RV sewage may be safely emptied into a sanitary sewer system. These are often found at campgrounds, many truck stops, and some gas stations. This station is also called a “Sani-Dump”.
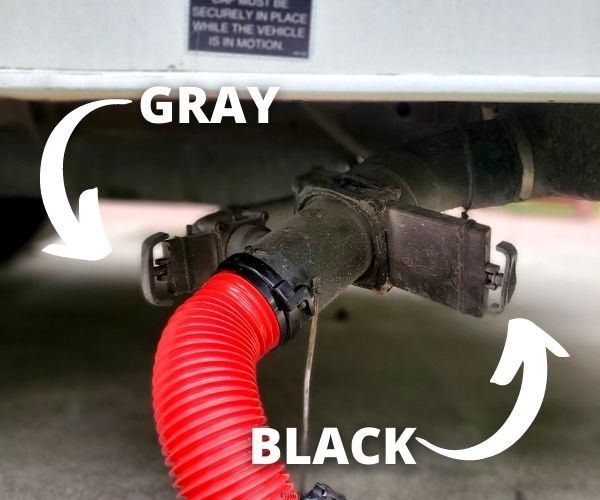
Gate Valve – A common valve for RV water supply systems that acts like a gate, either allowing water flow or stopping the flow stream by sliding an element back and forth by a handle. Typically the gate valve handles are color coded gray or black pertaining to the appropriate holding tanks.
Holding Tanks – As their name implies, these tanks (situated underneath the RV) hold either freshwater, wastewater, or sewage. These are called the Freshwater Tank, Gray Water Tank, and Black Water Tank, as detailed above.
Honey Wagon — A truck, trailer, or even campground work cart transporting a large liquid tank either driven or towed around to pump out RV waste tanks. (Can be referred to as “pump out trucks“.)
Macerator Pump — RV macerators are motorized grinders that turn black tank components into a slurry that is pumped through a small garden-sized hose by an electric pump– rather than drained through a RV sewer hose using gravity. By this, tank matter can be pumped long distances, even uphill to hard-to-reach sewer inlet locations. Macerator systems can either be portable or built into an RV unit.
Stinky Slinky – Another name for a sewer hose used to drain RV holding tanks.
Tank Flush – A system that flushes out and helps clean the black tank. It is often found in the water bay or in the general vicinity of the dump valves as a water inlet port. Once a designated hose (for contamination purposes) is connected and a water source is turned on, water travels into the black tank and is sprayed out by a nozzle, cleaning off loose debris from the tank walls. This system helps maintain the black holding tank by cleaning out waste particles, rinsing off built-up materials, minimizing odors, and ensuring tank sensors are working correctly.
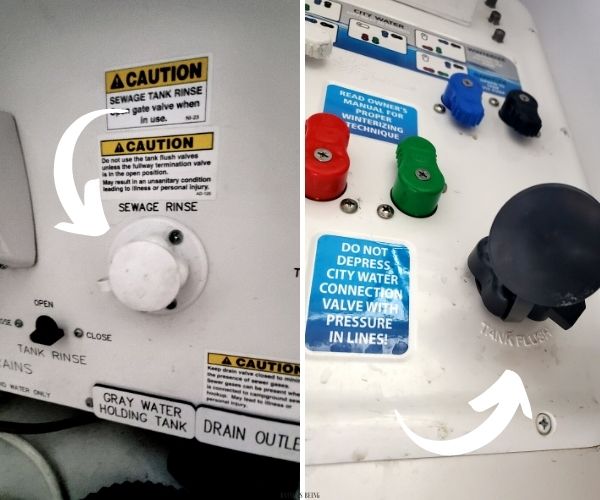
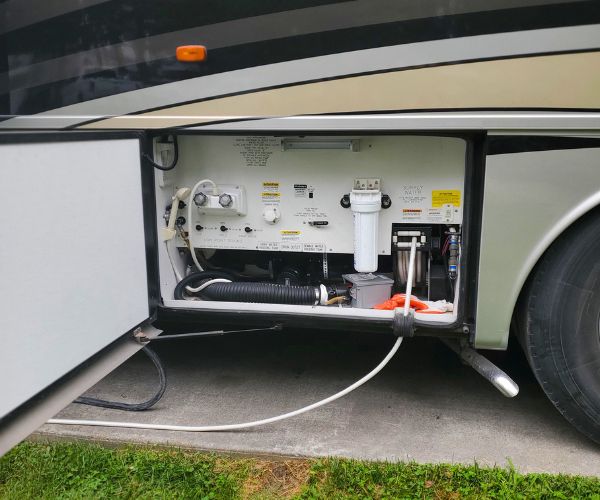
Wet Bay – The exterior RV compartment that houses the water and dump connections. This area, often in newer RVs, can also contain an outside shower, water filter, dry camping, and winterizing options.
To jump to step-by-step instructions on how to empty RV waste tanks, click here!
The Dreaded “Poo Pyramid”
Last but not least, the ultimate term that makes RVers shudder… The “Poo Pyramid”…
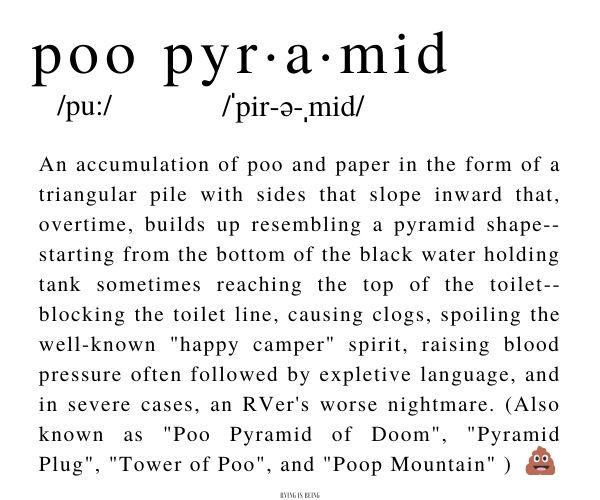
So, how do you prevent the dreaded Poo Pyramid from forming?
The main cause of a Poo Pyramid generally comes down to too much solids with not enough liquids in the black holding tank.
Check out the three biggest mistakes RVers make, below, with tips to steer clear of tank troubles!
Mistakes that Mess Up Your Tanks
#1 Leaving the black water tank OPEN– While there’s nothing wrong with leaving your RV hooked up to sewer and even leaving the gray holding tank gate valve open to drain (especially during showers, running laundry, or washing the dishes), it’s a big NO-NO to do so with the black tank. In fact, if the black tank valve is kept open, liquids flushed will continuously flow around the solids and drain out of the tank– leaving a build-up of toilet paper and waste stuck to the bottom. Always leave the black tank valve CLOSED until you are ready to dump.
#2 Not using enough water when flushing– Skimping on water leads to a build-up of solid waste and toilet paper in the tank. This can cause tank troubles, odor, and even a poo pyramid to form. The more water flushed down makes components less likely to stick, build-up, and clog. Using a sufficient amount of water and letting it accumulate helps create a flow to force contents out when draining. With this in mind, try to use a generous amount of water when flushing to make sure there’s plenty of liquids ending up in the black tank.
#3 Not being careful about what goes down the toilet– Never flush anything other than human waste, RV septic safe toilet paper, and RV holding tank treatments. RV toilet paper is manufactured to quickly breakdown, preventing clogs and further tank issues. At the same time, RV holding tank treatments help break down solids and reduce odors.
Tips to Steer Clear of Tank Troubles
- Keep the black tank gate valve closed until you are ready to dump the tank.
- Use plenty of water when flushing.
- Always empty the black holding tank first and then the gray tank. Have multiple holding tanks? Keep the process the same. (Black tanks first!) By saving the gray tank for last, it helps rinse out the sewer hose.
- Never put anything in the black tank other than RV toilet paper and human waste. Accordingly, stick to treatments and that are made specifically for RV holding tanks. (Refer back to your owner’s manual for appropriate products.)
- Put a few gallons of water into your tank after dumping along with an RV-safe holding tank treatment.
- Remember, the gray holding tank system can get clogged too! Be mindful of what goes down the kitchen sink and shower.
- Never store your RV for long periods with black waste water in it.
- Don’t always trust tank sensors. Stuck on toilet paper can cause sensors to read differently. For this reason, know your tanks! (Especially if you have multiple gray or black holding tanks.) Learn what sources they fill from to get an idea when capacity is almost reached.
- Take care of your RV unit’s system. Routinely flush, clean, and maintain components and valves.
Remember, Dump Responsibly!
You are dealing with raw sewage…
Sewage and wastewater contain bacteria, parasites, and viruses– and while there’s no getting out of this tedious chore, it’s important to do so safely and responsibly!
At the same time, keep in mind that you’re not the only one who has used the dump station or sewer inlet. In fact, hundreds of other campers’ tanks have been emptied in that same area. Spills, leaks, and drips happen!
With this in mind, wear gloves, wash your hands, and consider what you’re tracking back into your home-on-wheels. Keep sewer hoses in a designated bin or latching tub to keep other camping gear safe and clean.
Tips to Keep You Healthy
- Wear gloves and dispose of them in an appropriate trash receptacle.
- Keep sanitizer in the outside compartment to quickly clean your hands after emptying the tanks.
- Keep a travel sized Lysol close to spray the bottom of your shoes before tracking back into the RV.
- Wash your hands!
- If any spills happen, clean the area so you or the next camper aren’t at risk.
- Never place any sewer hoses, attachments, or accessories on a campsite picnic table.
- Wash your clothing and shoes if anything splashes on you… Lysol Laundry Sanitizer is great to have on-hand for messy road trips!
- Store hoses and connectors in a designated storage bin to avoid contact and contamination with other belongings.
- Make sure to use approved, sealed sewer connections and gear that are in good working order. Replace any parts with leaks, cracks or bad seals.
Don’t spread germies throughout your journeys! Read more tips (here) to keep your traveling family safe and healthy!
To jump to step-by-step instructions on how to empty RV waste tanks, click here!
How to Dump Your… Dump!
Gear & Accessories Needed
The Basics
The basic attachments you need to empty the holding tanks are; 1.) an RV fitting (this connects the sewer hose to the RV. Luckily, many sewer hoses already have pre-installed rotating fittings with bayonet hooks for lug style connections), 2.) a sewer hose, and 3.) a sewer fitting (secures to the sewer/dump station inlet where the sewer hose attaches to).
About RV Sewer Connections and Fittings — Not all accessories and fittings work with all RVs and sewer connections. However, bayonet/lug-style connections are typically uniform and a standard fit for RV connections. The lug end, fortunately built into many RV unit sewer connection pipes, consists of four prongs. Bayonet-style fitting accessories feature L-shaped slots that twist onto the lug end, creating a tight connection so that tank contents can be drained through.
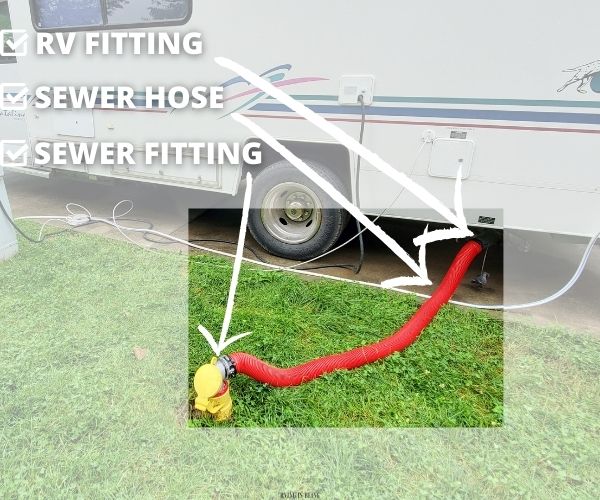
Consider purchasing an all-in-one Sewer hose kit. For example, pictured above is the Valterra EZ Coupler 20 Foot RV Sewer Hose Kit. This kit comes with two collapsible 10-foot hoses (only one is being used above) with both pre-attached fittings and a clear view adapter to see when draining is complete. (If parked or positioned farther away from the sewer inlet, the other 10-foot extension would be added to easily reach.)
Check out these popular all-in-one sewer hose kits that work with the most standard RV lug/bayonet-style connections:
Remember, you’ll need just a basic sewer hose kit to get the job done, however, you can always add some bells and whistles to improve the process, maintain your system, and adapt to different campground setups!
Accessories: The “Bells & Whistles”
- – These accessories attach to the campground/dump station sewer inlet on the ground and provide sewer hose hookup.) Adapters vary in the way they attach to the inlet, the angle it provides, transparency, etc. Unless stationary or long term campers, you’ll find that not all campground sewer hookups are the same. For instance, some have threaded sewer inlets or smooth inlets– and in different sizes– making adapters extremely handy to have on board.
- For threaded inlets, the Valterra Coupler 90 Bayonet Sewer Fittingor Camco RhinoFlex Fitting Adapter works great by adapting to differently-sized threaded connections.
- For smooth, stripped, or dirty inlets, the Camco Flexible 3-in-1 Adapter Hose Seal and Foam Rubber Seal pushes in place so a threaded adapter or hose can be easily attached.
- The Rhino Flexible Sewer Hose Drain Adapter is designed for hard-to-reach angles, even working with damaged threads. It has a convenient handle and wings for easy placement and clean removal.
- For campgrounds or sewer inlets with rigid piping, Valterra’s Rotating Rigid Pipe Adapter is ideal.
- Valterra Coupler 90 Bayonet Sewer Fitting– Clear fittings come in handy to see when your tanks are completely done draining or when water is clear from flushing. These can either be a sewer fitting or waste valve fitting, depending on the style. For example, one can either connect to your RV waste valve fitting or to the campground sewer inlet.
- Sewer Hose Extension – Parked or positioned far away from a sewer inlet? Add an extension to reach!
- sewer hose support– Protects and provides a gradual slope from the RV to the ground inlet for efficient drainage.
- Wye Fitting – Have multiple waste tanks? Wye fittings allows two sewer hoses to connect to the same dump station and be emptied.
- Sewer Hose Coupler – Use this to attach two sewer hoses together that incorporate slip-over fittings.
- Sewer Hose Clamp – Securely connect sewer hoses to fittings. Lacking tools? Check out the Camco Twist-It Clamps. Simply position the clamp and twist the thumb grip.
- Twist On Waste Gate Valve – Leaky or broken gate valves? No RVer ever wants to get a faceful when they take off the sewer dump cap! Add a quick repair alternative along with a second layer of protection with this leak-proof attachment. This twist-on valve fits most standard RV units.
- RV Cleanout Gray/Black Hose – Ideal for flushing RV black, gray, or tote tanks while keeping impurities separate (from the drinking water or garden hose). Attach the 10 foot clean out hose to your water supply, connect the rinser cap to the other end of the clean out hose, connect the rinser cap to your RV’s sewer hose and rinse.
- – A tank flush accessory is ideal if your RV doesn’t include a tank rinse system. The Camco RV Dual Flush, Valterra Flush King, or Valterra RV Hydro Flush work from the unit’s exterior, easily twisting on and off by connecting to your RV sewer pipe and your sewer hose to the valve. Refill and reverse-flush the holding tank to clear clogs, stuck on materials, and reduce odors.
- Swivel Stik – Keep your sewer system in tip-top shape by dislodging and flushing stubborn waste deposits left in the tank after it’s emptied. Rather than flushing from the exterior of the RV unit, this Swivel Stik slides through the toilet bowl down into the holding tank blasting the tank walls.
- Sewer Weight
– One thing RVers NEVER want to happen is their sewer hose and attachments coming undone at the sewer inlet creating a disastrous mess! Sewer weights hold the sewer hose or elbow adapter in place, preventing it from detaching from the sewer inlet.
- Holding Tank Treatment – Control odors, breakdown waste, and keep sensors working correctly by treating your holding tank.
Step-By-Step Instructions to Empty Tanks
1.Pull up to the dump station and park where the RV sewer connections are as close as possible to the sewer inlet. (You’ll want the sewer hose to easily reach from the RV to the sewer inlet.)
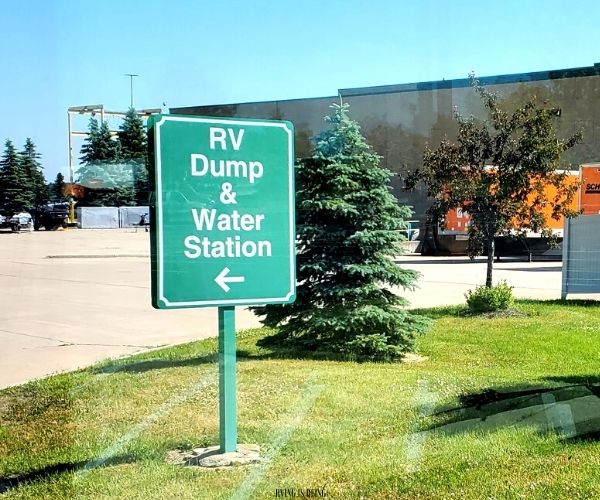
2.Unlock the wet bay, put gloves on, and get out your RV sewer hose and accessories. (We will be using the Valterra EZ Coupler 20 Foot RV Sewer Hose Kit.)
3.First, locate and get familiar with the wet bay compartment (if your unit has one). This is usually on the driver’s side of the RV, as is the RV sewer connection. Keep in mind, some rigs have a simple set up, with only the sewer connection equipped with gate valves.
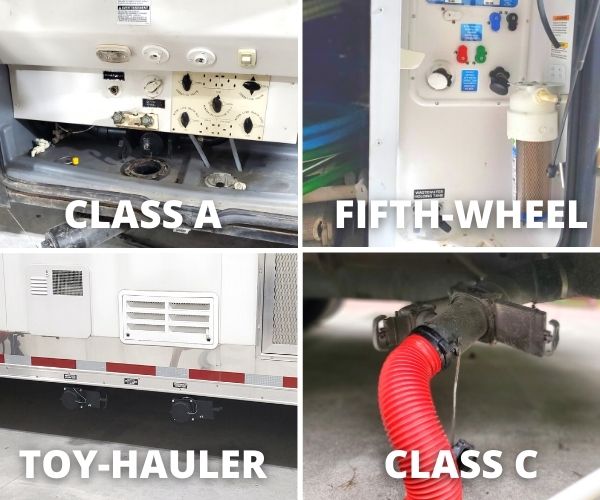
Your setup may look a little different on your trailer or motorhome. Some rigs include a large wet bay containing the whole shebang: the sewer system, fresh water system, water filtration systems, and a “control panel” displaying knobs to fill, drain, flush or winterize the rig. Other units setups are more simplistic and straightforward– like the toy hauler and Class C (above).
4.Locate the sewer connection on your RV. This is where the sewer hose will be attached– but don’t attach it just yet! In fact, we are going to start hooking gear up at the opposite end first.
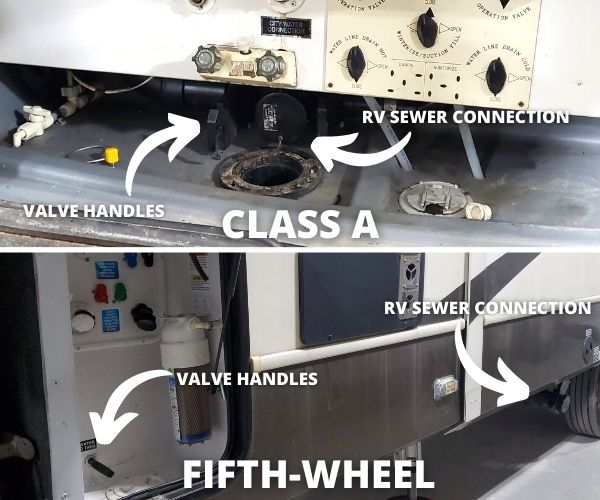
No matter how your unit is set up, they all include a 3-inch sewer connection along with color-coded gray and black valve handles you would pull to release and empty each holding tank. The sewer connection and valve handles will almost always be on the driver’s side of the RV but aren’t always right next to each other. (For example, above, this Class A motorhome has the sewer connection and waste valve handles inside the wet bay, whereas the fifth-wheel’s sewer connection is away from the wet bay area and valve handles.)
5.After getting familiar with your set-up, locate the dump station or campground sewer inlet. Attach a sewer fitting to the ground inlet.
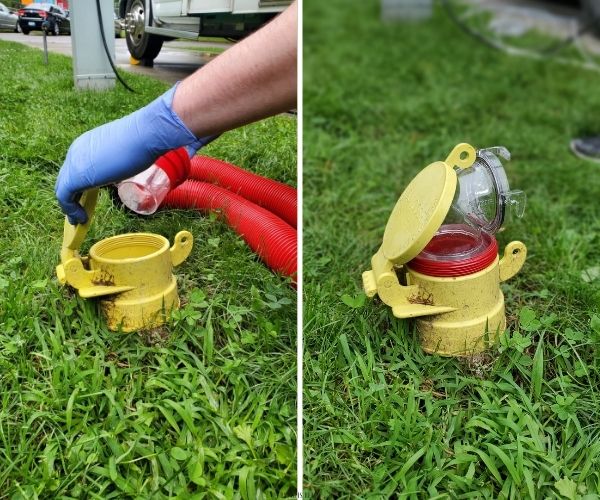
Here, we are using the Valterra Coupler 90 Bayonet Sewer Fitting. The different sized threads will fit most dump station inlets while the clear material allows you to see when the tank is done emptying.
6. Next, attach the sewer hose to the sewer inlet fitting.
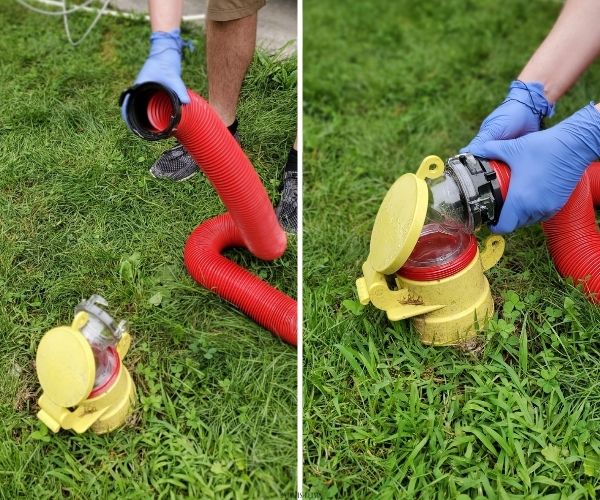
Why not connect the hose to the RV first? Connecting the sewer hose to the ground sewer inlet first helps drain any leftover wastewater (from previously emptying the tanks) down the inlet and from dripping out the hose all over you and your campsite!
7.Remove your RV’s sewer connection cap, and hookup the other end of the sewer hose to the RV connection. Here’s where many campers attach a Camco Dual Flush Pro if their RV is not equipped with a black tank rinse system. Simply install the flush accessory to the RV sewer connection and then attach the sewer hose.
Be sure that the attached accessories are firmly secure and tightly sealed!
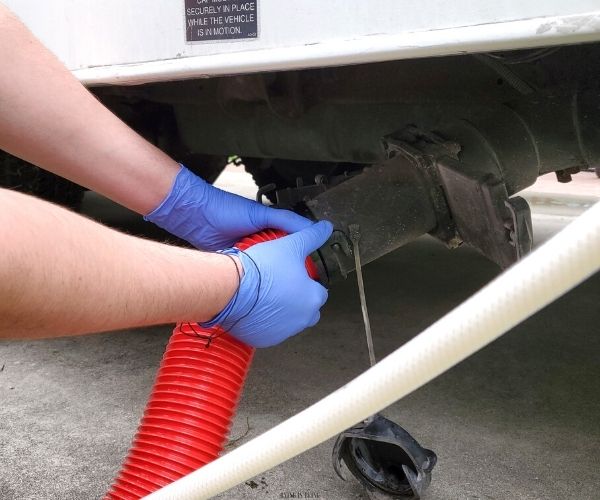
Hooray! You’re hooked up! Here’s where a sewer hose support can also come in handy by creating a nice slope for contents to smoothly flow down the hose into the sewer.

8.Time to empty! Pull the black tank valve handle to empty the black tank first. Allow it to drain completely.

Many handles are color-coded either gray or black, however, if yours isn’t easily identifiable– the handle on the larger pipe controls the black tank whereas the handle on the smaller pipe controls the gray tank.
9.Once the black tank is emptied, close the blank tank valve by pushing the handle firmly inward.
10.Next, open the gray tank valve and let it empty. Remember, do this after emptying the black tank to help clean out the sewer hose!
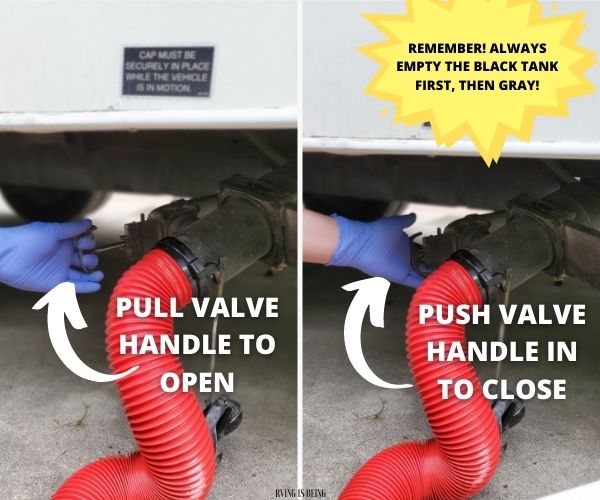
11.Once emptied, close the gray tank valve by firmly pushing the handle inward.
12.Repeat these steps if you have more than one gray or black tank.
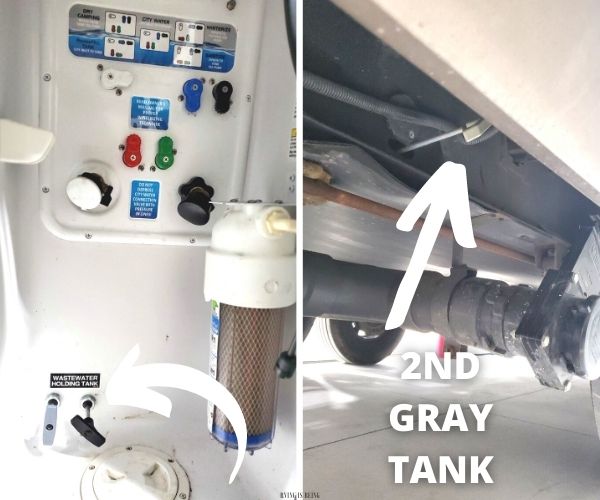
(For example, check out the fifth-wheel above. Aside from the gray and black valve inside the compartment, there’s also a second gray water holding tank with another valve handle tucked underneath the unit! Whether you have two gray tanks or two black tanks– it’s still the same process. Always remember to empty the black first, then gray. It’s also important to know your tanks– what sources they fill from and how quickly each tank fills– especially when it comes to having multiple tanks.)
13.If your RV has a black tank rinse system, use a designated hose (never use your fresh water hose), like the RV Cleanout Gray/Black Hose. Connect one end to the RV tank rinse port and the other end to the water spigot. Open the black tank gate valve and turn on the water. This will help rinse out any stuck materials off the sidewalls and bottom of the tank. Rinse until the water runs clear.

If your RV does not have a tank rise, consider getting an attachment like the Valterra Flush King or Camco Dual Flush Pro. If using either of these, you’ll want to attach this accessory first to the RV unit when you are carrying out Step #7. Connect a clean-out hose to the flush accessory and the other end to the water spigot. Open the black tank valve and turn on the water to flush up and rinse out the black tank. Rinse until the water runs clear.
14.When finished, turn off the water, and close the black tank valve. MAKE SURE ALL GATE VALVES ON THE RV ARE CLOSED.
15.Disconnect the RV Cleanout Gray/Black Hose from the RV tank flush port or flushing accessory and store.
16.Recheck that both your black and gray water tank valves (and main gate tank valve, if equipped) are in CLOSED position before disconnecting the sewer hose.
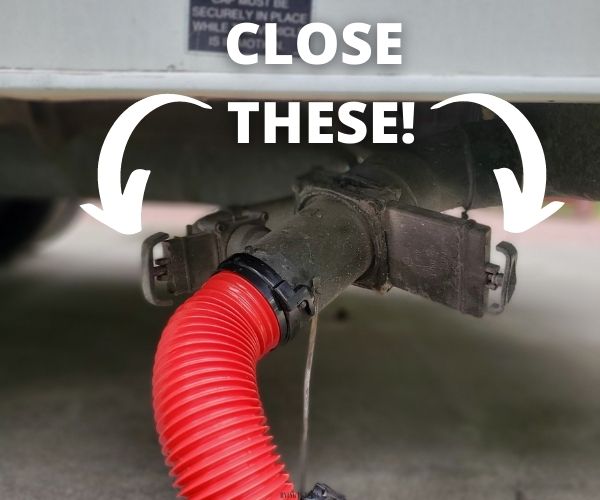
Remember to always, always, ALWAYS close these valves! If a valve is not closed, gray or black water will build up behind the cap! In other words, get ready for a CRAPTASTROPHY!
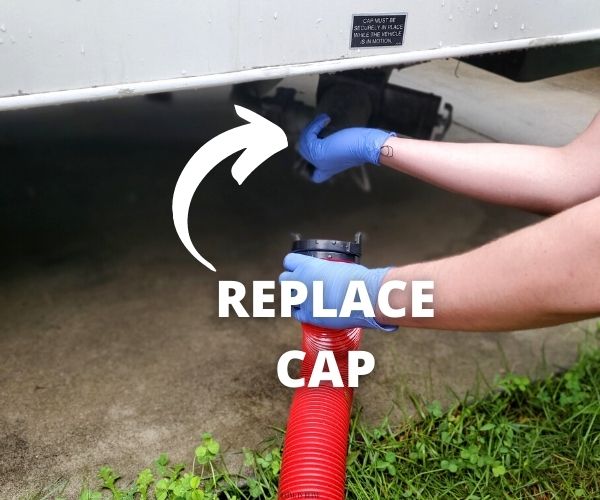
17. Lift the sewer hose to drain the excess water into the ground inlet. Then detach the sewer hose from the RV along with any other adapters or flushing accessories and replace the cap.
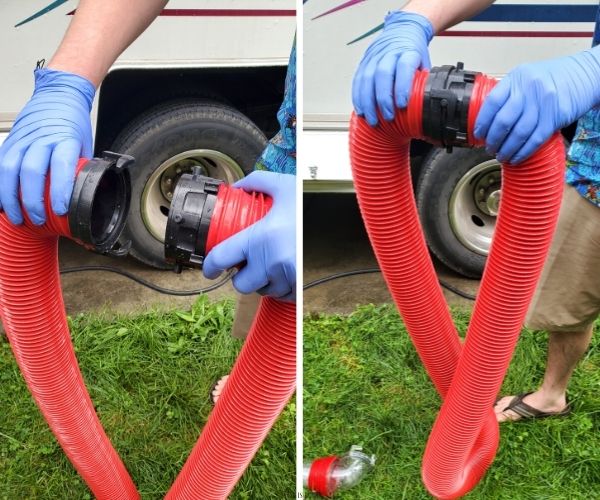
18.Disconnect the other end of the hose and fitting from the ground sewer inlet. If you can, connect the two ends of the sewer hose to each other so that excess water doesn’t leak out!
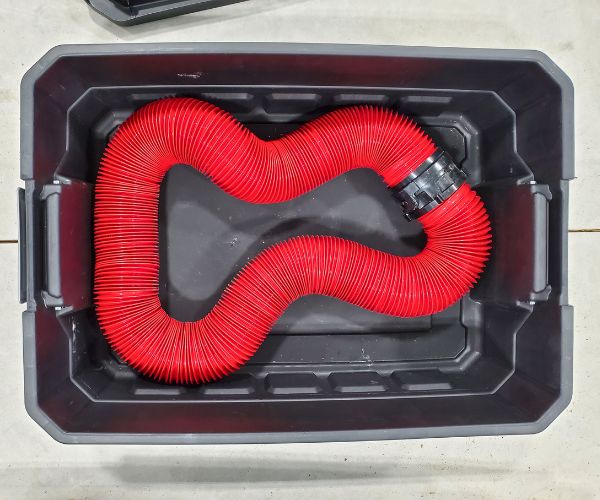
19.Store the sewer hose, clean-out hose, and any accessories in a designated bin. A latching bin is ideal to keep these accessories contained and away from contaminating other camping gear. IRIS Weathertight Black Storage Bins work great for sealing contents inside. Also, you can’t mistake other camping totes and bins with this one! Black bin = black tank supplies!
20.Sanitize any contaminated areas with antibacterial wipes or spray. Then, dispose of your gloves in an appropriate waste receptacle and wash your hands!
21.Check the tank display sensors to make sure they read empty.
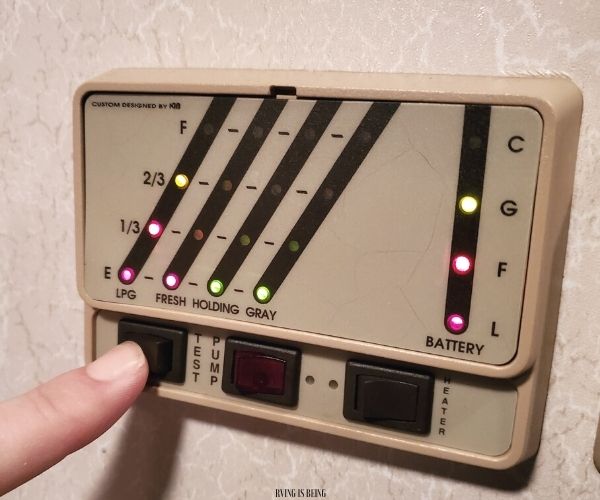
22.Finally, fill the RV toilet with a few gallons of water and add treatments! (Don’t skimp on the water– you’ll want the bottom of the tank completely covered so solids crash ‘n splash NOT hit ‘n stick!)
RVING IS BEING on “doo-ty” duty!
Related posts
Today's pick
Hot topics
Disclosure: This website contains affiliate links, meaning we will get a commission if you decide to make a purchase through the links, at no additional cost to you. Additionally, this website is an Amazon Associate. As an Amazon Associate, the owner of this website earns a commission as a result of certain qualifying purchases. CERTAIN CONTENT THAT APPEARS ON THE SITE TO WHICH THIS SITE LINKS ARE AFFILIATE LINKS. THIS LINKED CONTENT IS PROVIDED “AS IS” AND IS SUBJECT TO CHANGE OR REMOVAL ANY TIME. Please read this Site’s disclosure and privacy policy & terms for more information.
Categories
- Children & Family (15)
- Cookout Gear & Accessories (6)
- Food (2)
- Guide (37)
- Health (5)
- Holidays (10)
- List (10)
- Maintenance & Repair (10)
- Printables (4)
- Products & Accessories (40)
- Quote (3)
- RV & Campsite Setup (23)
- RVING (78)
- Shop Page (36)
- Storage & Organization (2)
- Tech (4)
- Travel (22)


