This post contains affiliate links, meaning I get a commission if you decide to make a purchase through my links, at no extra cost to you. Please read my disclosure and privacy & terms for more info.
RV holding tanks must be emptied routinely.
To complete this, you’ll need to park your camper at either an RV dump station or at a campsite that includes a sewer inlet.
Refer to this quick guide on how to empty your RV waste holding tanks.

How To Empty RV Waste Holding Tanks
1.Position your RV on a campsite or at a dump station where your sewer hose can easily reach the ground sewer inlet.

2.Unlock the wet bay and cargo, put on gloves and get out your RV sewer hose and accessories.

Product Shown: Valterra EZ Coupler 20 Foot RV Sewer Hose Kit
3. Attach a sewer fitting to the dump station ground inlet.
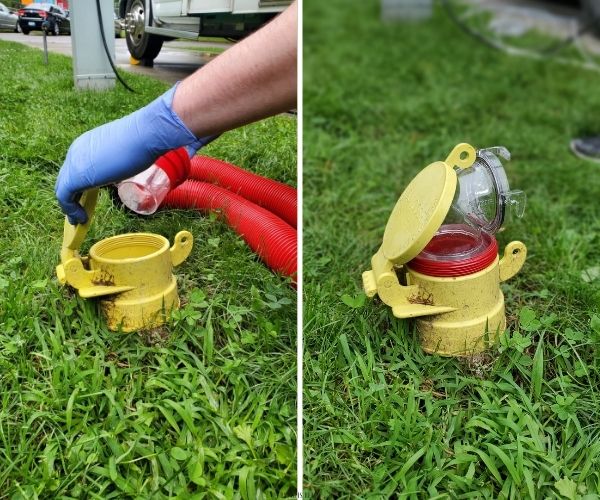
Product Shown: Valterra Coupler 90 Bayonet Sewer Fitting
4.Connect one end of the sewer hose to the ground sewer fitting.
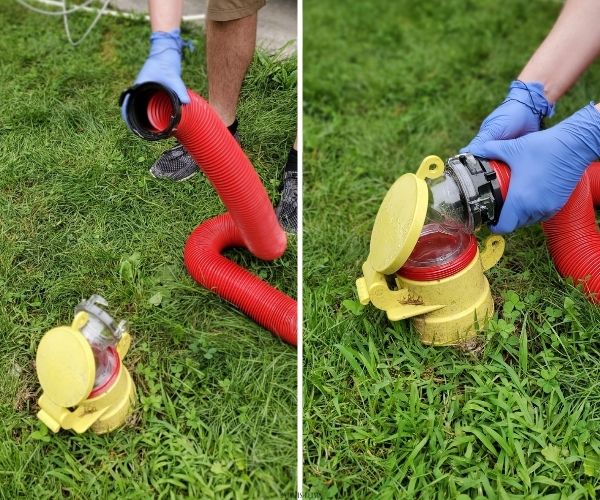
5. Then remove your RV’s sewer valve cap and connect the other end of the sewer hose to the RV sewer connection.

If you wish to attach an extender or adapter, this goes on between securing the sewer hose to the RV sewer connection.
Some campers connect a clear view fitting, extender, or flush adapter, like the Valterra Flush King or Camco Dual Flush Pro, if their RV is not equipped with a tank rinse.
6. Set-up is complete.
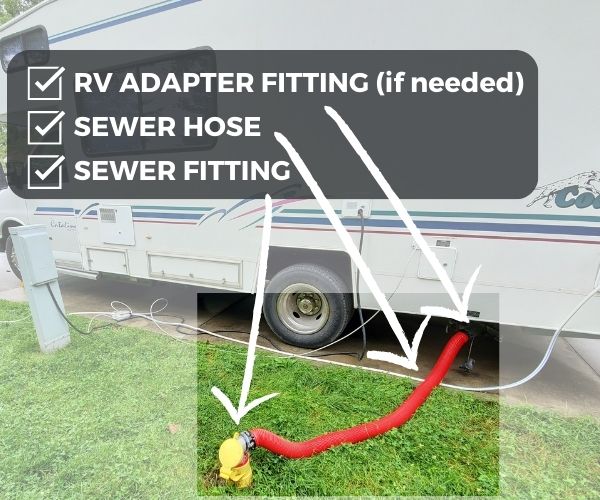
Here’s where a sewer hose support can come in handy, providing a steady slope to help contents drain where sewer inlets are raised or at higher ground level.
7. Empty the black tank first. Pull the black tank gate valve handle to empty the black tank. Allow it to drain completely.
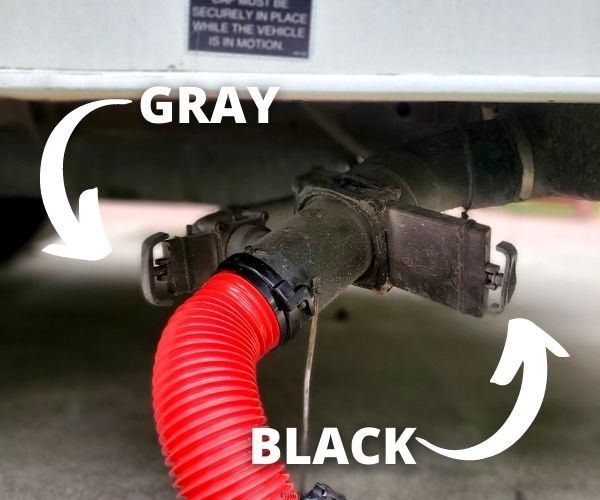
(If not labeled or color-coded, the black tank’s gate valve is generally larger than the gray water valve.)
8. Once the black tank runs empty, close the blank tank valve by pushing the handle firmly inward.

9. Next, pull the gray tank’s valve handle and let it empty. Do this after emptying the black tank contents to help flush out the sewer hose.

10. When it runs empty, close the gray tank valve by firmly pushing the handle inward.

11. If the RV is equipped with a tank flush system, use your own clean-out hose connected to a water source, or use the designated flush hose often provided at dump stations attached to the non-potable water inlet. Connect one end of the clean-out hose to the RV’s tank flush/sewage rinse connection port and the other to the water spigot. Open the black tank gate valve and turn on the water source to rinse off any stuck on materials. Flush until the water runs clear. Turn off the water, disconnect the clean-out hose and store. CLOSE THE BLACK TANK GATE VALVE.

Camco RhinoFlex Black Water Clean-Out Hose is ideal for flushing RV black water, gray water or tote tanks.
12. If your RV is NOT equipped with a tank rise system and you added an adapter like the Valterra Flush King or Camco Dual Flush Pro back in step #5, carry out a similar process like above. Attach one clean-out hose end to the flush accessory and the other to a water spigot. Open the black tank gate valve and turn on the water to flush up and into the RV waste tank– rinsing any stuck materials out until the water runs clear. Turn off the water, disconnect the clean-out hose and store. CLOSE THE BLACK TANK GATE VALVE.
13. Make certain that both the black and gray water tank valves are in CLOSED position. (ALL GATE TANK VALVES SHOULD BE CLOSED!)
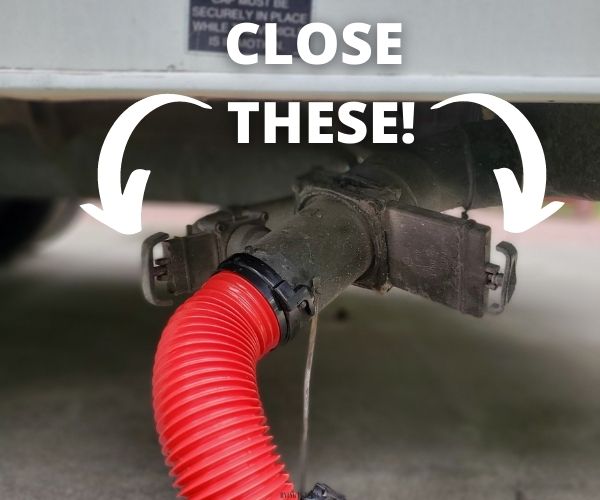
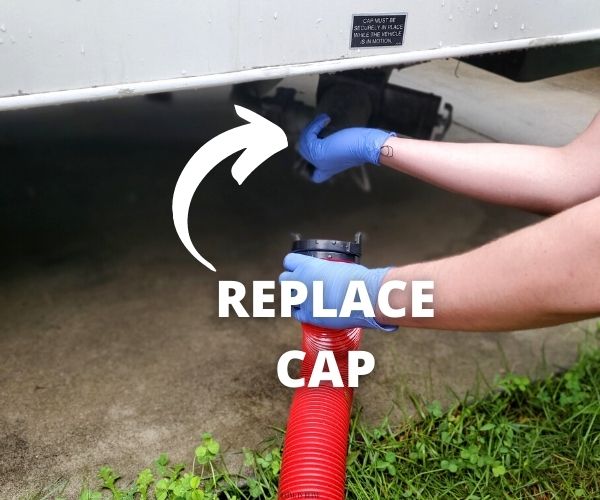
14. Detach the sewer hose (and adapter) from the RV sewer connection and replace the sewer connection cap. Lift the hose to drain the excess water into the ground inlet.
15. Disconnect the other end of the hose from the ground sewer inlet. Unfasten sewer inlet fitting and store.

16. Store the sewer hose, flush hose, and any accessories in a designated bin, keeping items contained and away from contaminating other gear. Either try to store the sewer hose where the ends point in an upward position, so that waste water is less likely to dribble out. (Sewer hose storage caps work great for reducing drips and odors.) As another option, connect the two ends of the sewer hose to each other to prevent excess water from leaking out.

Sewer hose storage caps work great for sealing sewer hose ends and reducing drips and odors.
17. Dispose of gloves in an appropriate waste receptacle, sanitize any contaminated surfaces, and wash your hands.
18. Check the tank display sensors to make sure they read empty.

19.Flush a few gallons of water down the RV toilet, then add a holding tank treatment.
RVING IS BEING adventurous.
Related posts
Today's pick
Hot topics
Disclosure: This website contains affiliate links, meaning we will get a commission if you decide to make a purchase through the links, at no additional cost to you. Additionally, this website is an Amazon Associate. As an Amazon Associate, the owner of this website earns a commission as a result of certain qualifying purchases. CERTAIN CONTENT THAT APPEARS ON THE SITE TO WHICH THIS SITE LINKS ARE AFFILIATE LINKS. THIS LINKED CONTENT IS PROVIDED “AS IS” AND IS SUBJECT TO CHANGE OR REMOVAL ANY TIME. Please read this Site’s disclosure and privacy policy & terms for more information.
Categories
- Children & Family (15)
- Cookout Gear & Accessories (6)
- Food (2)
- Guide (37)
- Health (5)
- Holidays (10)
- List (10)
- Maintenance & Repair (10)
- Printables (4)
- Products & Accessories (40)
- Quote (3)
- RV & Campsite Setup (23)
- RVING (78)
- Shop Page (36)
- Storage & Organization (2)
- Tech (4)
- Travel (22)


